Project Structure
This guide explains the project layout step by step. Each section includes a screenshot so you can see exactly what to look for in your code editor. Files you need to change are clearly marked.
Follow the steps in order. Each builds on the previous one.
Step 1: Project Overview
When you open the project, this is what you see — all folders and files in one place:
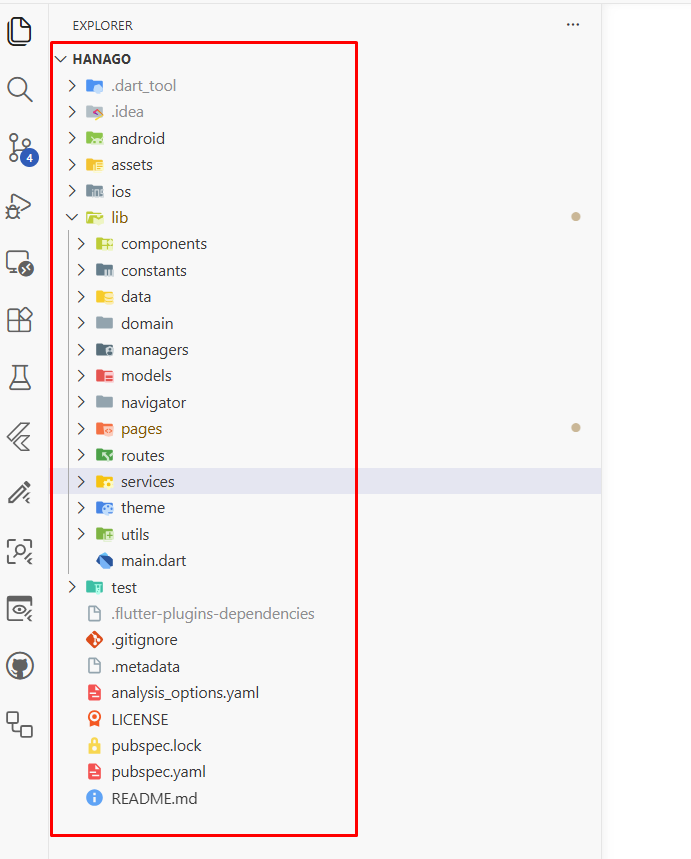
| Folder / File | What It Is |
|---|---|
android/ | Android phone build settings |
ios/ | iPhone build settings |
assets/ | All images, icons, fonts, translations |
lib/ | All the app code — main folder |
pubspec.yaml | App config file |
test/ | Automated tests |
Step 2: Config File — pubspec.yaml
Open this file first. It controls the app version, dependencies, and which image folders are included.
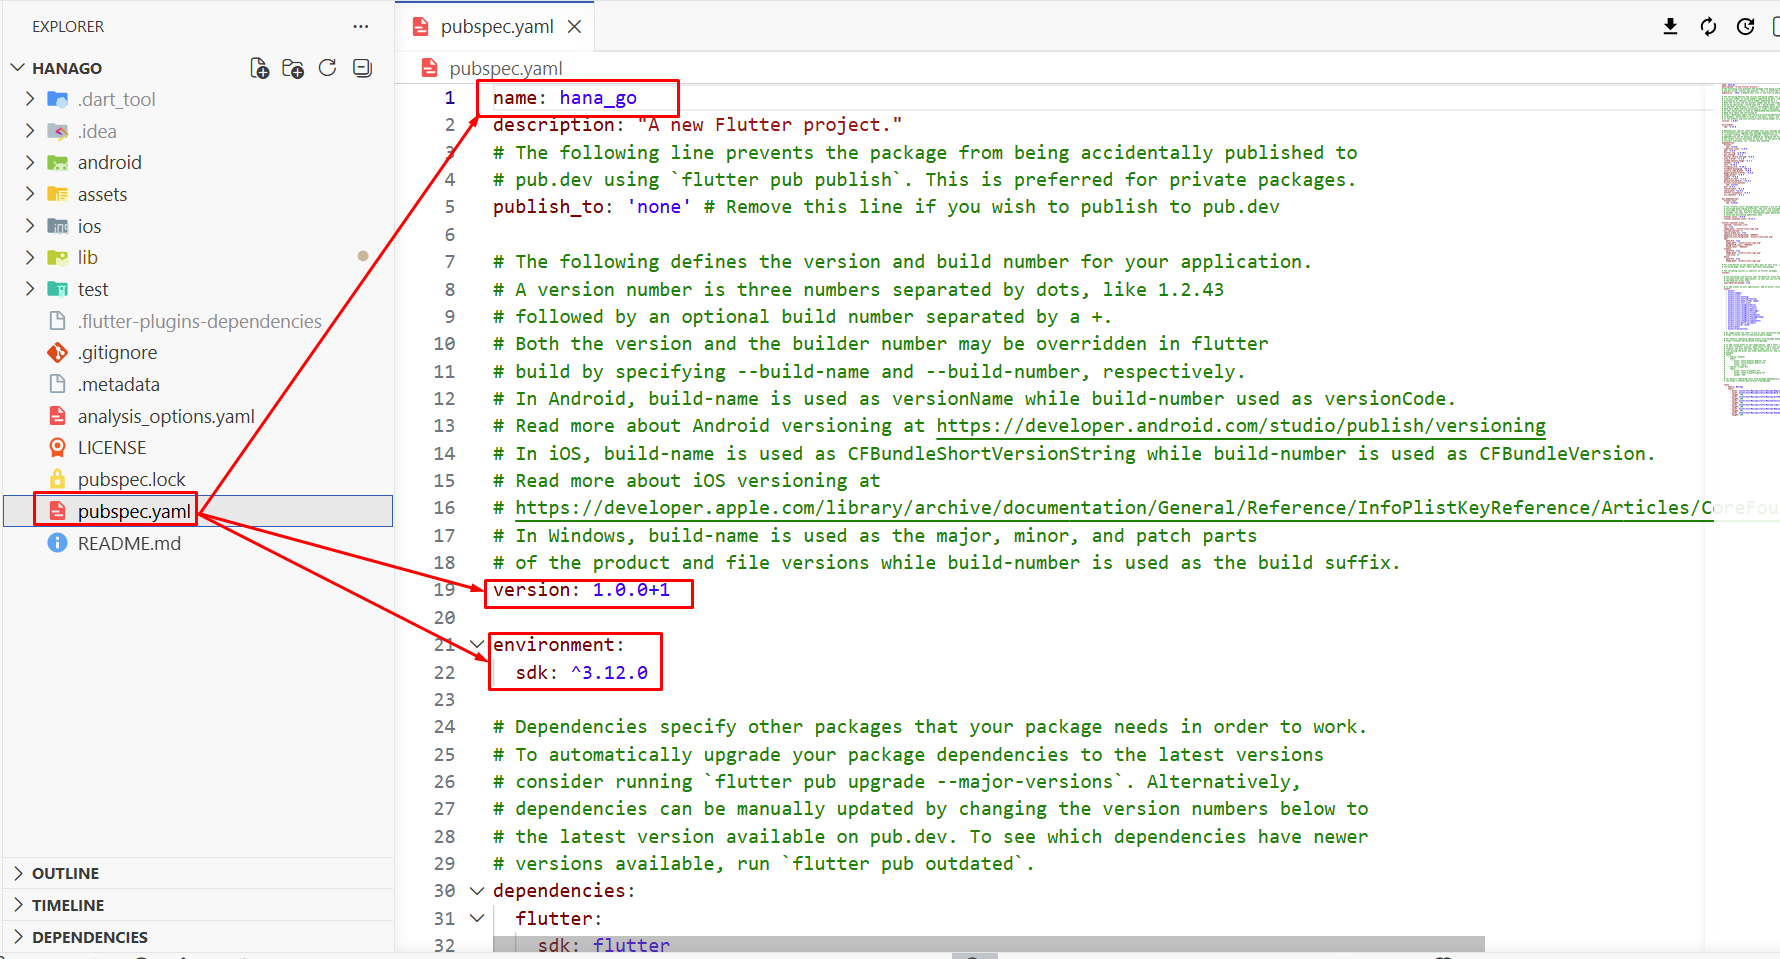
| Section | Line | What to Change |
|---|---|---|
| App Name | Line 1 | Change automatically → Automated Rename |
| Version | Line 19 | Change 1.0.0+1 to your version |
| Description | Line 3 | Change app description |
:::tip Quick Rename
Use change_project_name package to rename everything automatically. See Automated Rename below.
:::
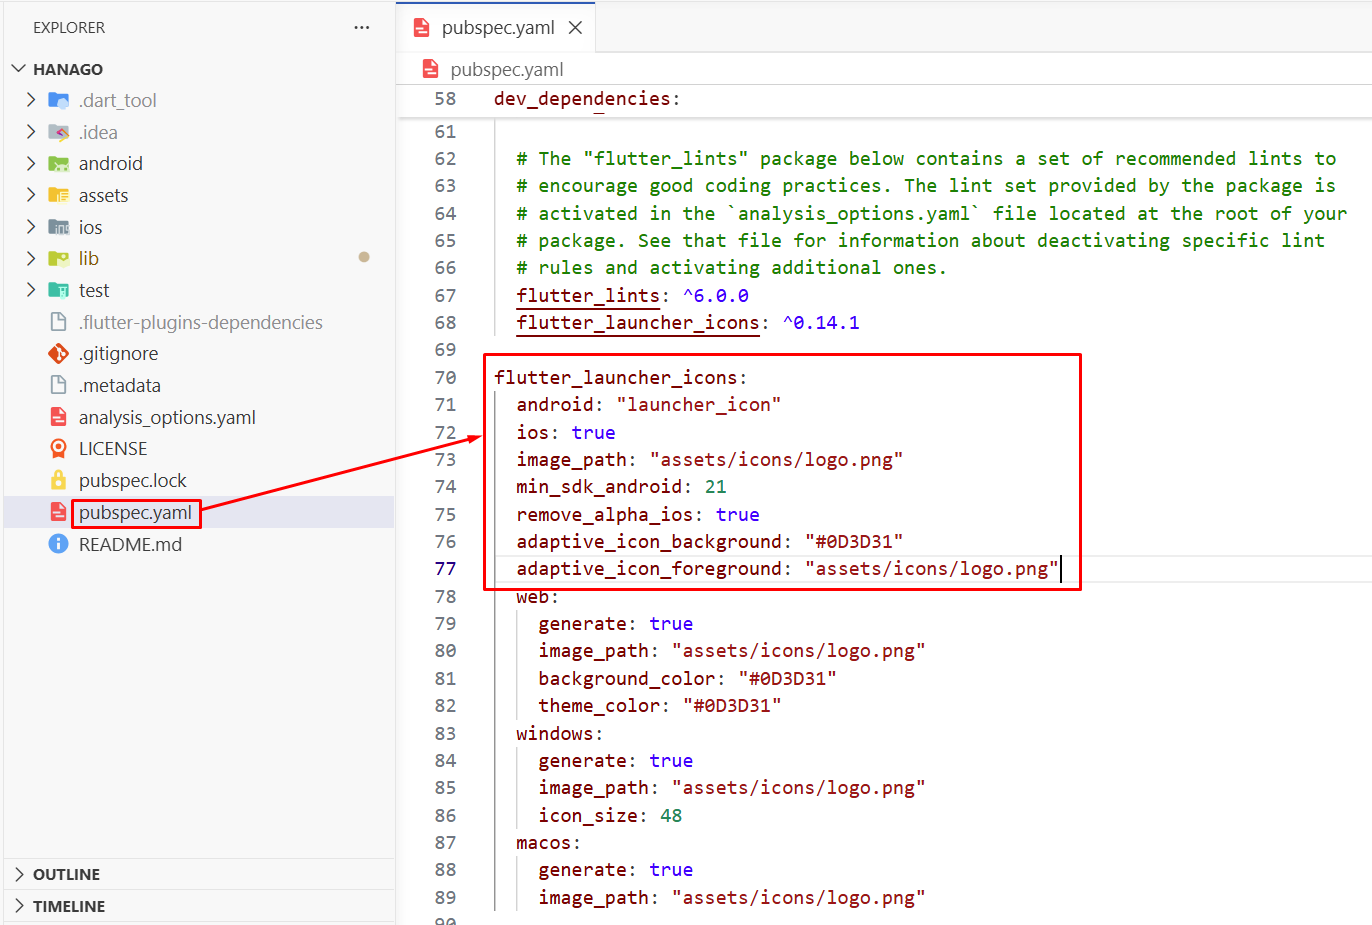
| Section | What to Change |
|---|---|
flutter_launcher_icons: | Replace assets/icons/logo.png with your logo |
adaptive_icon_background: | Change background color for Android adaptive icon |
adaptive_icon_foreground: | Change foreground image for Android adaptive icon |
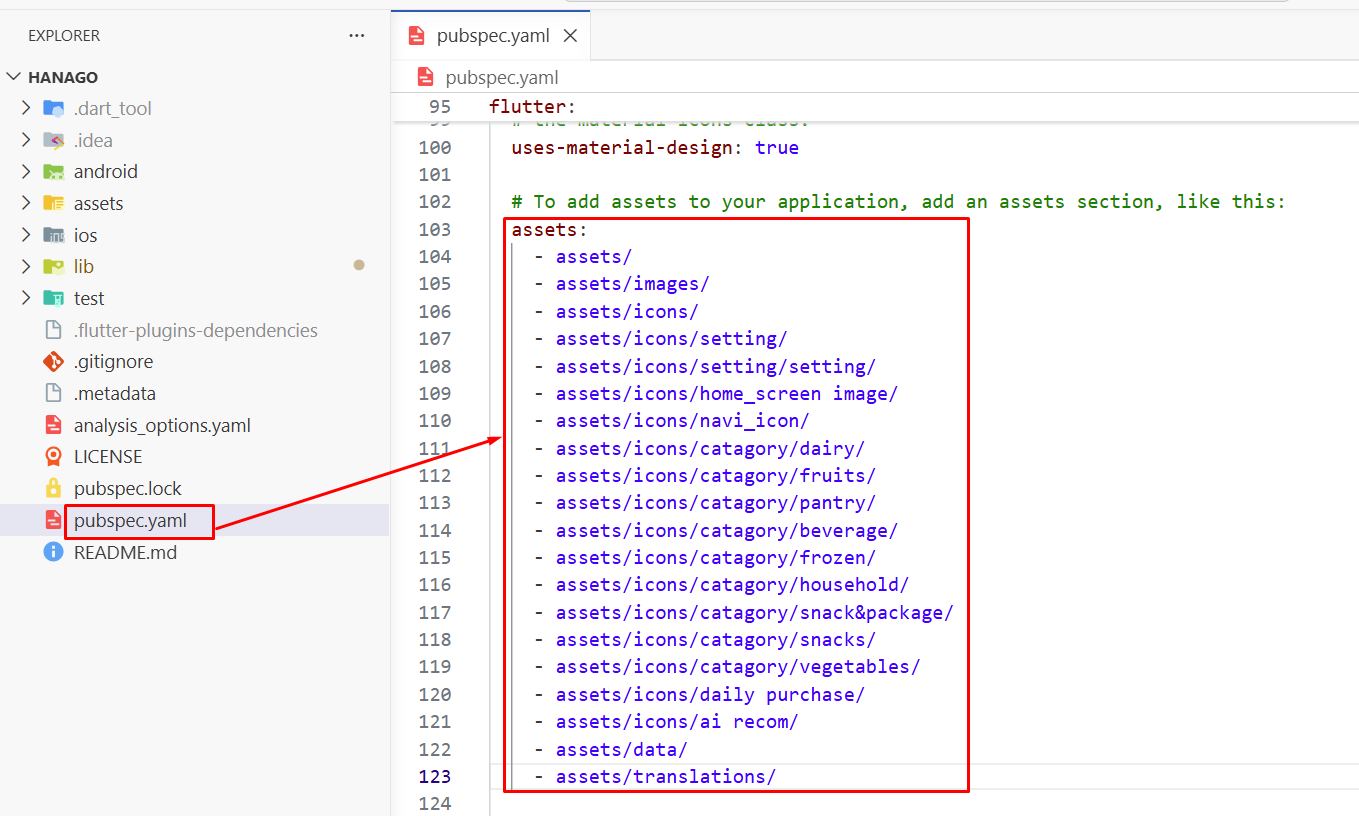
| Section | What to Change |
|---|---|
flutter: assets: | Add new image folders here |
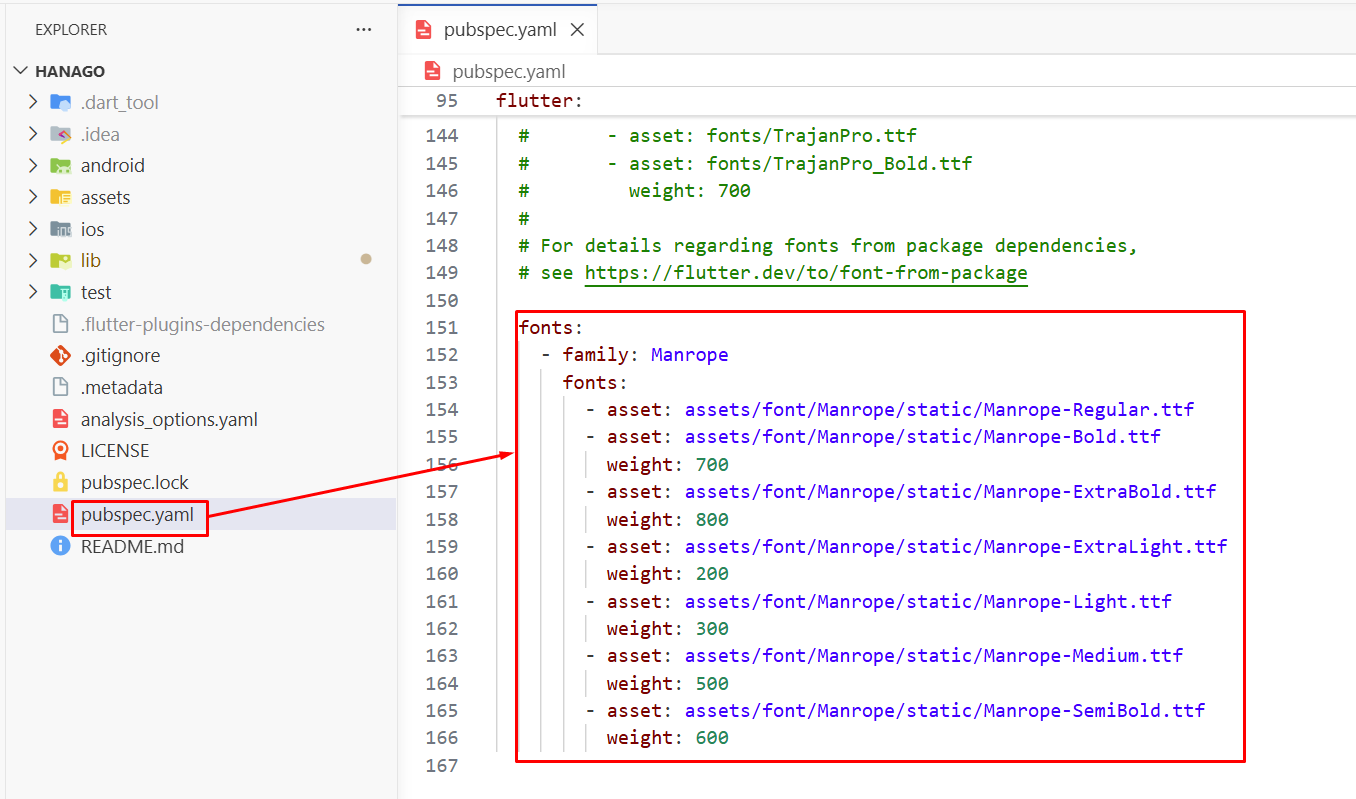
| Section | What to Change |
|---|---|
fonts: | Replace font files in assets/font/ |
Step 3: Assets — Images, Icons, Fonts, Translations
This folder holds everything that is not code — pictures, icons, fonts, and language files.
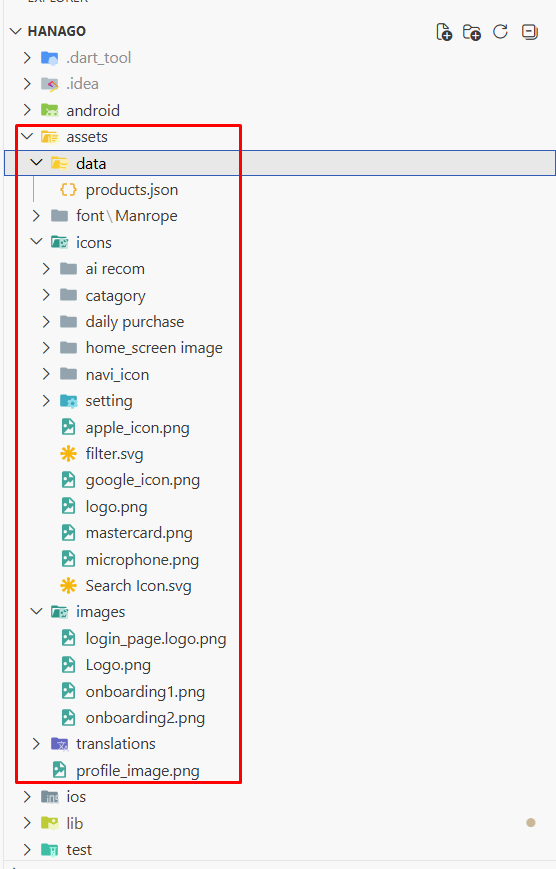
| Subfolder | What It Contains | Action |
|---|---|---|
data/ | Product data JSON file | Replace with your products |
font/ | App font files (Manrope) | Replace with your fonts |
icons/ | Category icons, nav icons, logos | Replace with your icons |
images/ | Onboarding images, logos | Replace with your images |
translations/ | Language files (9 languages) | Edit text for your app |
Icons Folder
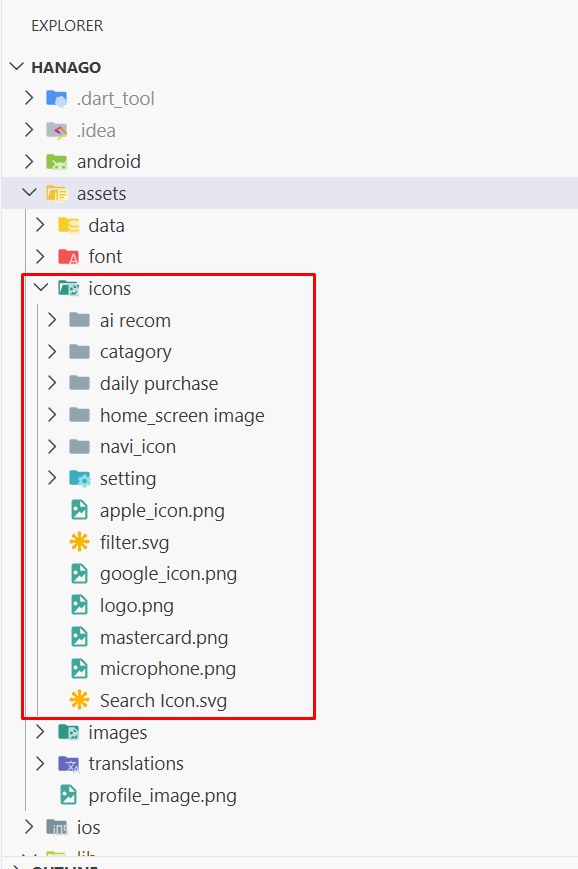
| Subfolder | What It Contains | Action |
|---|---|---|
logo.png | App icon (splash, login, home screen) | Replace with your logo |
catagory/ | Product category icons (9 categories) | Replace with your icons |
home_screen image/ | Home screen banners | Replace with your banners |
navi_icon/ | Bottom navigation bar icons | Replace with your icons |
setting/ | Settings screen icons | Replace with your icons |
Translations Folder
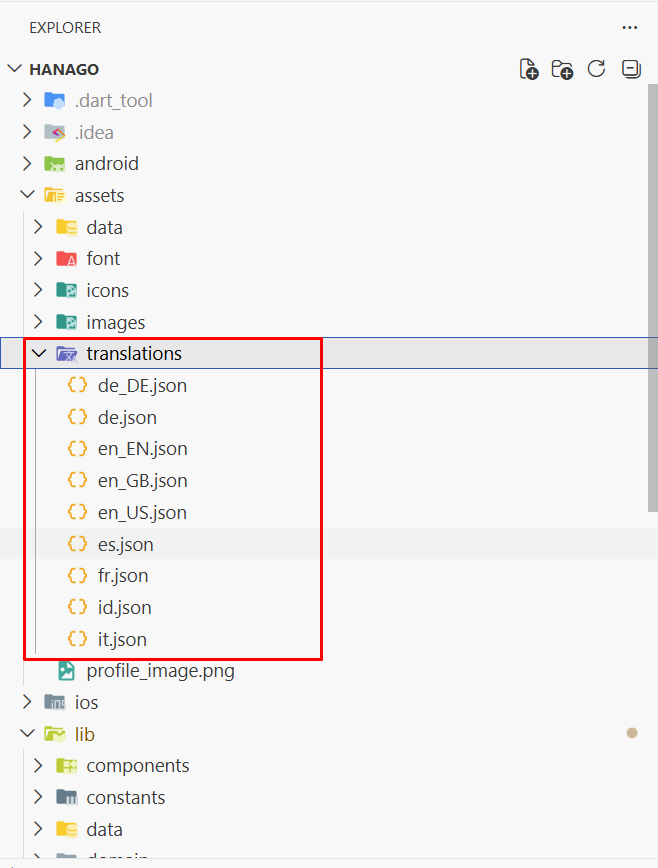
| File | Language | Action |
|---|---|---|
en_US.json | English (default) | Edit all English text |
fr.json | French | Translate or delete |
es.json | Spanish | Translate or delete |
de.json | German | Translate or delete |
| Other files | More languages | Translate or delete |
Step 4: App Code — lib/
This is the main folder. Every screen, button, and feature lives here.
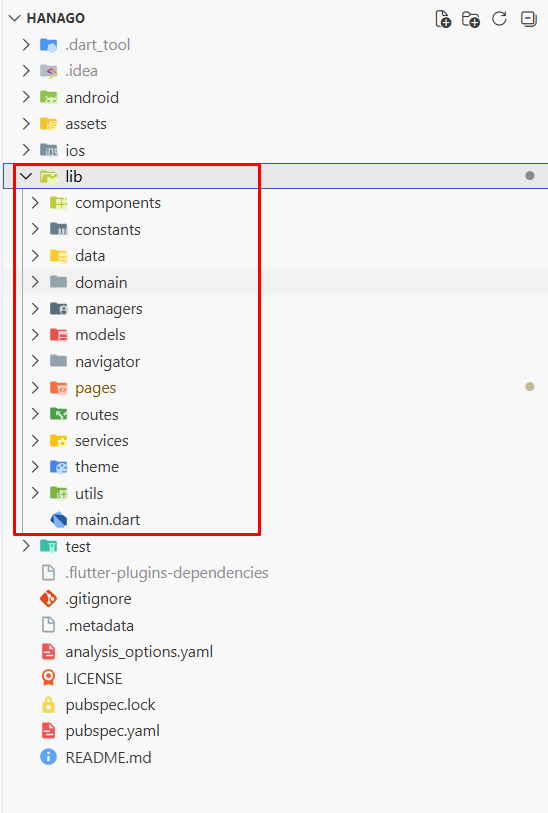
| Folder | What It Contains | Action |
|---|---|---|
main.dart | App entry point | Change initial route if needed |
constants/ | Colors, fonts, spacing, config | Change brand colors here |
models/ | Data structure definitions | Leave as is |
data/ | Data loaders and repositories | Leave as is |
services/ | Background workers (cart, profile) | Leave as is |
components/ | Reusable UI elements | Customize button/card styles |
pages/ | All screens the user sees | Customize screen layouts |
routes/ | Screen navigation map | Add new screens here |
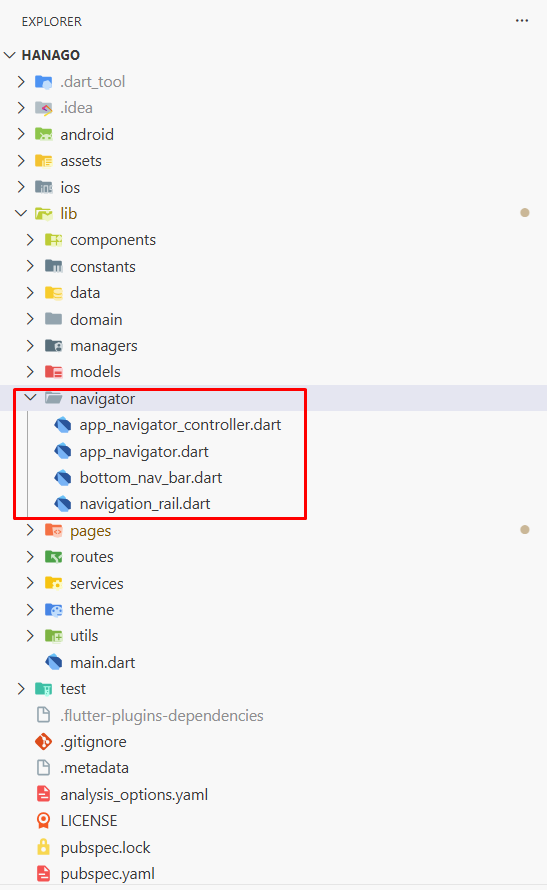
navigator/ | Bottom navigation bar | Change tab icons/order |
theme/ | App visual style | Leave as is |
Step 5: main.dart — The Starting Point
This is the very first file Flutter runs.
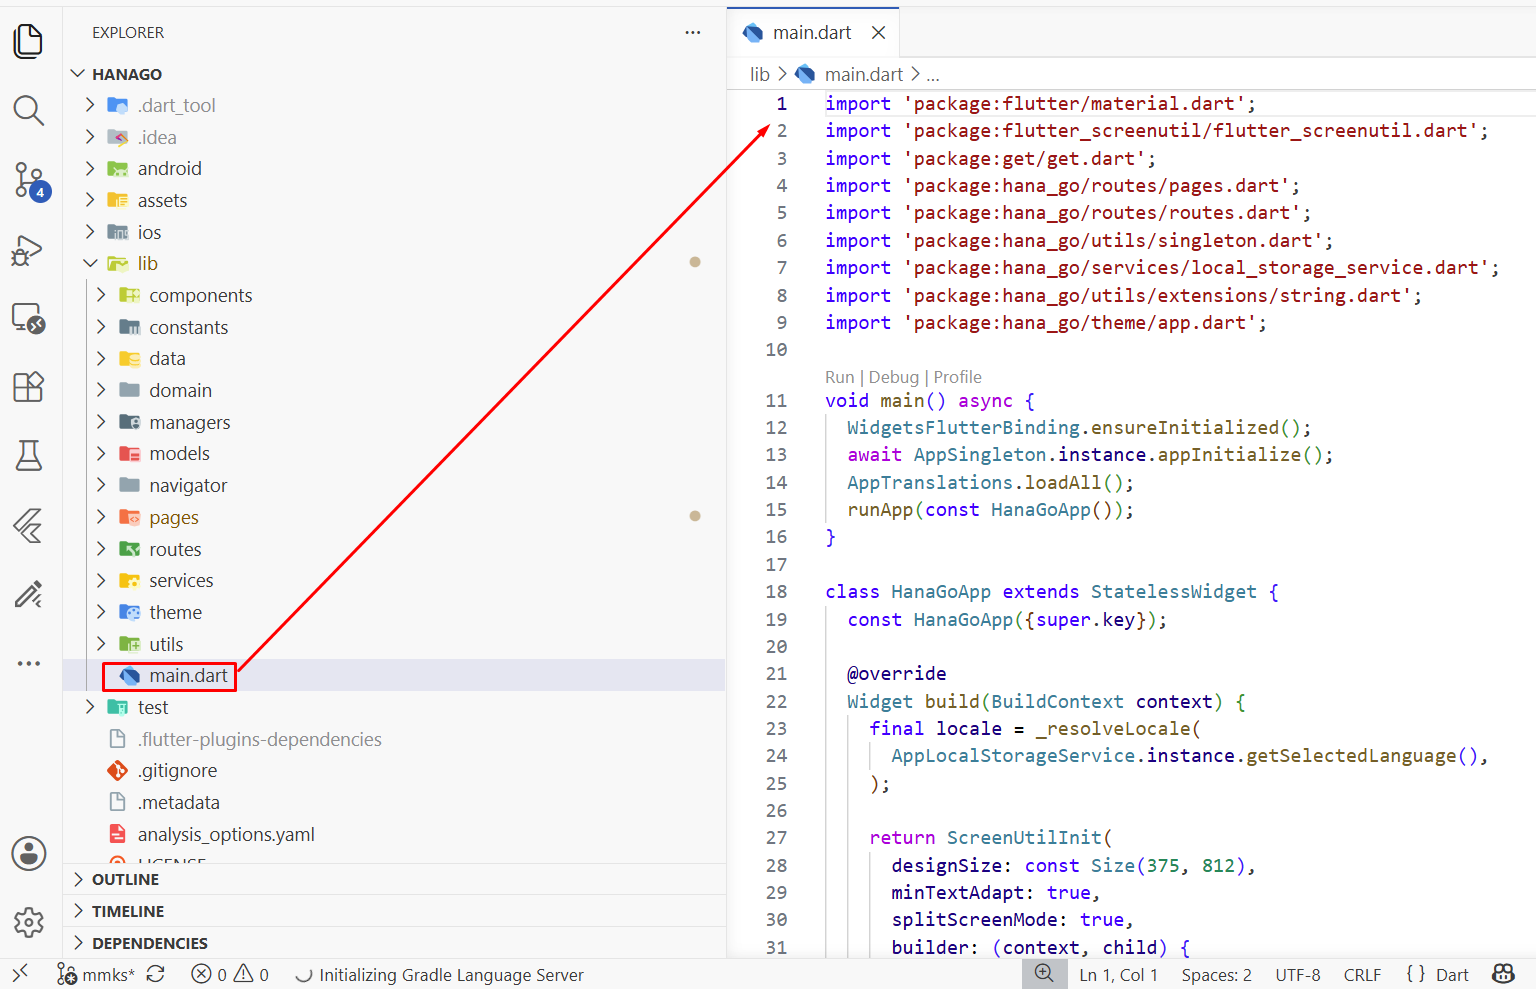
| What It Does | Line | Action |
|---|---|---|
| Initialize storage | Line 10 | Leave as is |
| Load translations | Line 15 | Leave as is |
| Start at Splash screen | Line 25 | Change if you want different start screen |
// This line controls which screen appears first
initialRoute: Routes.splashPage,
The Splash screen automatically navigates to Onboarding (first run) or Home (returning users).
Step 6: constants/ — All Design Values
This folder is the single source of truth for the app's visual design. Change a value here and it updates everywhere.
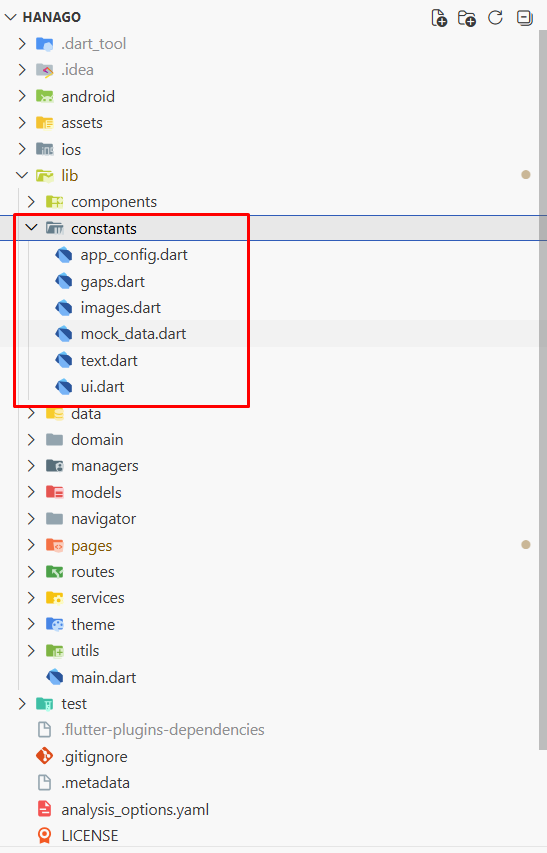
| File | What It Controls | Action |
|---|---|---|
ui.dart | All colors (primary green, backgrounds, borders) | Change brand colors |
text.dart | All font sizes and text weights | Adjust if needed |
gaps.dart | All spacing values (padding, margins) | Adjust if needed |
images.dart | Central list of every image path | Update if you rename images |
app_config.dart | App name, AI settings, pricing rules | Change app name and config |
mock_data.dart | Sample data for testing | Leave as is |
Colors in ui.dart
| Variable | Hex | Used For | Change To |
|---|---|---|---|
primaryColor | #004B30 | Main brand green — buttons, headers | Your brand color |
mintGreen | #D2F6D2 | Light green backgrounds | Your light background |
yellowColor | #EAB308 | Accent yellow — icons, highlights | Your accent color |
bgColor | #FAFAFA | Screen backgrounds | Your background color |
Config in app_config.dart
| Variable | Current Value | Change To |
|---|---|---|
appName | 'GreenCart' | Your app name |
appTagline | 'Smart Grocery Shopping' | Your tagline |
supportEmail | 'info@appstick.com.bd' | Your support email |
aiName | 'Hana AI' | Your AI assistant name |
freeShippingThreshold | 50.0 | Your free shipping minimum |
shippingCharge | 2.0 | Your flat shipping fee |
discountThreshold | 25.0 | Minimum order for discount |
discountAmount | 4.0 | Fixed discount amount |
Step 7: models/ — Data Blueprints
Models define what a piece of data looks like. They are blueprints, not the data itself.
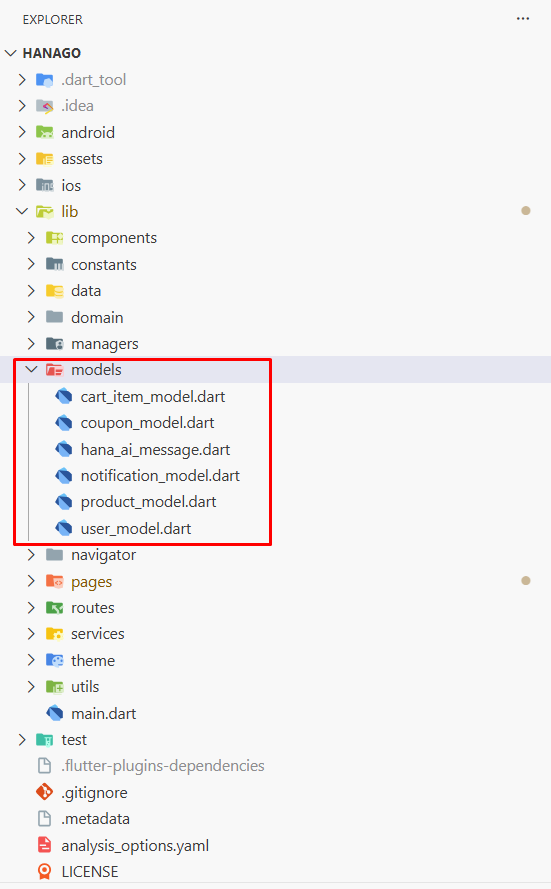
| Model | What It Describes | Action |
|---|---|---|
product_model.dart | Product — name, price, image, category | Add fields if needed |
cart_item_model.dart | Cart item — product + quantity | Leave as is |
user_model.dart | User — name, email, phone, avatar | Add fields if needed |
coupon_model.dart | Coupon — code, discount, expiry | Leave as is |
notification_model.dart | Notification — title, message, time | Leave as is |
hana_ai_message.dart | Chat message — user input + bot response | Leave as is |
You rarely need to edit these unless you want to add new data fields (like "rating" or "brand" to products).
Step 8: data/ — Loading Product Data
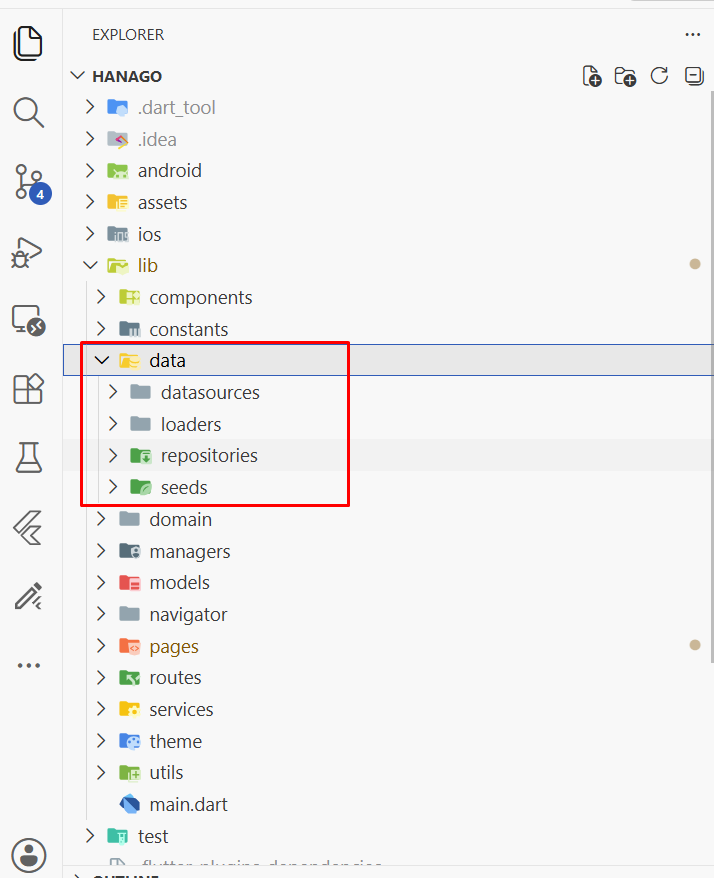
| Subfolder | What It Contains | Action |
|---|---|---|
loaders/ | Reads and parses JSON data | Leave as is |
repositories/ | Provides data to screens | Leave as is |
seeds/ | Default data that ships with the app | Customize if needed |
Data Flow
assets/data/products.json
        │
        ▼
lib/data/loaders/product_data_loader.dart
        │
        ▼
lib/data/repositories/product_repository_impl.dart
        │
        ▼
Screens use the data
Seed Data (Default Data)
| File | What It Provides | Action |
|---|---|---|
default_addresses.dart | Pre-filled delivery addresses | Replace with your addresses |
default_coupons.dart | Available coupon codes | Replace with your coupons |
default_notifications.dart | Welcome notifications | Replace with your notifications |
default_orders.dart | Sample order data | Replace with your orders |
default_payment_cards.dart | Saved payment methods | Replace with your payment methods |
Step 9: services/ — Background Workers
Services handle things that happen behind the scenes.
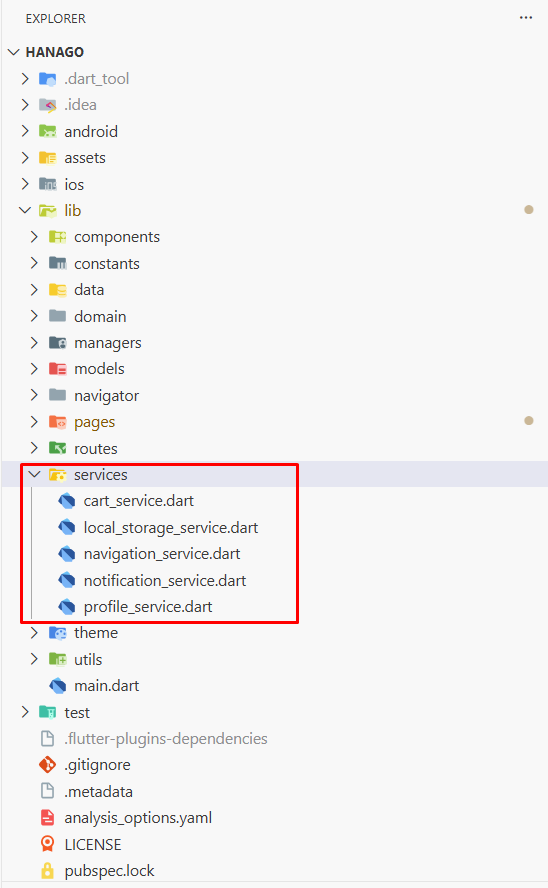
| Service | What It Does | Action |
|---|---|---|
cart_service.dart | Adds/removes items from cart, calculates totals | Leave as is |
profile_service.dart | Saves and loads user profile info | Leave as is |
notification_service.dart | Handles push notifications (Firebase) | Configure Firebase if needed |
local_storage_service.dart | Remembers settings (language, login state) | Leave as is |
navigation_service.dart | Shortcuts for moving between screens | Leave as is |
You rarely need to edit these unless you are adding a new background feature.
Step 10: components/ — Reusable Building Blocks
These are pre-built pieces used across many screens. Instead of building the same button 20 times, it is built once here and reused everywhere.
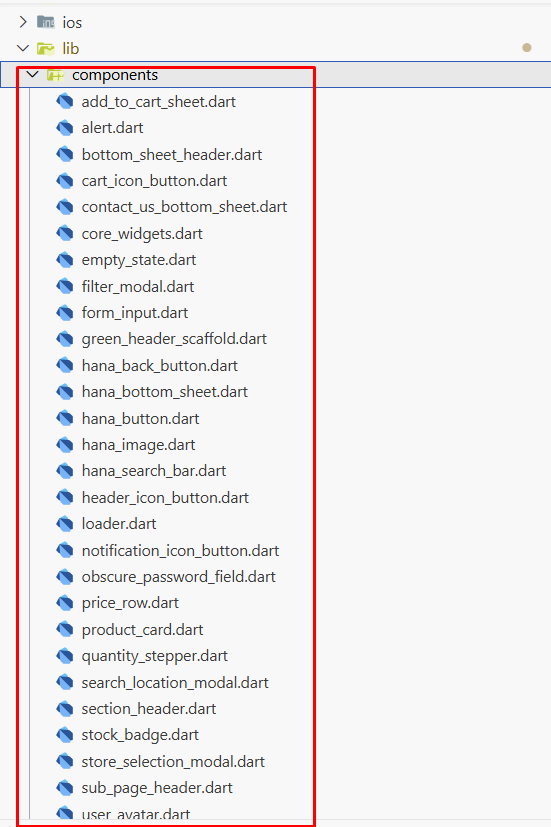
| Component | What It Is | Used On | Action |
|---|---|---|---|
hana_button.dart | Main green action button | Every screen | Change button style |
product_card.dart | Product card with image, price | Home, Category, Search | Change card design |
hana_search_bar.dart | Search input field | Home, All Products | Adjust if needed |
empty_state.dart | "Nothing here yet" illustration | Empty cart, wishlist | Replace image if needed |
form_input.dart | Text input fields | Login, Register, Checkout | Adjust if needed |
quantity_stepper.dart | +/- quantity controls | Cart, Product Details | Adjust if needed |
stock_badge.dart | "In Stock" / "Out of Stock" badge | Product Cards | Adjust colors if needed |
Step 11: pages/ — Every Screen in the App
This is the largest folder. Every screen the user sees is here.
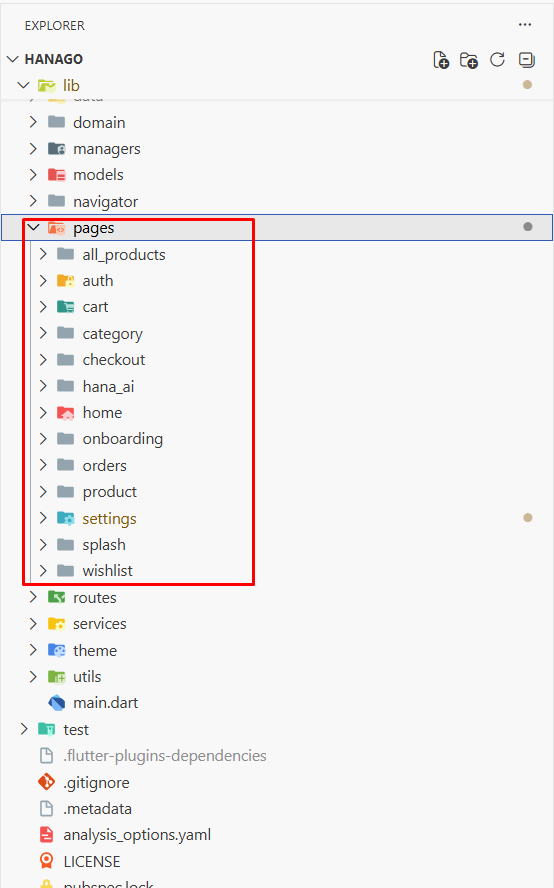
| Folder | What It Contains | Action |
|---|---|---|
splash/ | Loading screen — logo + animation | Replace logo |
onboarding/ | Welcome slides (2 slides) | Replace images |
auth/ | Login, Register, Forgot Password screens | Customize text/colors |
home/ | Main home screen — banners, categories | Replace banners |
category/ | Browse products by category | Leave as is |
product/ | Product list and detail page | Leave as is |
all_products/ | Search and browse all products | Leave as is |
cart/ | Shopping cart with quantity controls | Leave as is |
wishlist/ | Saved and liked products | Leave as is |
checkout/ | Address, delivery, payment, confirmation | Customize if needed |
orders/ | Order history and live tracking | Leave as is |
hana_ai/ | AI chat assistant | Configure AI if needed |
settings/ | Account, language, notifications, FAQ | Customize if needed |
How to Add a New Screen
Step 1: Create your screen in lib/pages/my_screen/my_screen_view.dart
Step 2: Add a route name in routes/routes.dart:
static const String myScreenView = '/my-screen';
Step 3: Connect it in routes/pages.dart:
_p(Routes.myScreenView, () => const MyScreenView()),
Step 4: Navigate to it from anywhere:
Get.toNamed(Routes.myScreenView);
Step 12: routes/ — Screen Navigation Map
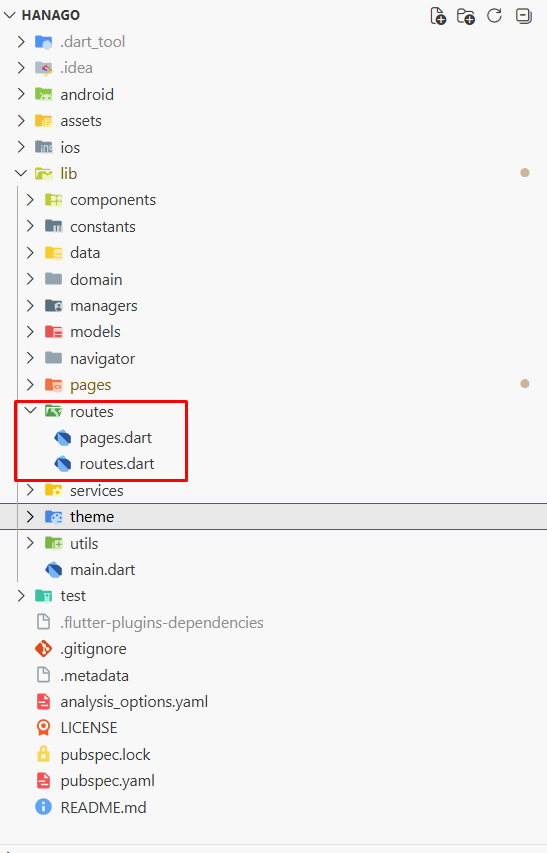
Two files that connect screen names to actual screens:
| File | What It Does | Action |
|---|---|---|
routes.dart | Lists all screen names (e.g. '/home', '/cart') | Add new route names here |
pages.dart | Connects each name to the actual screen widget | Connect new routes here |
Step 13: navigator/ — Bottom Navigation Bar
The 5-tab bar at the bottom of the screen:
| Tab | What It Opens | Action |
|---|---|---|
| Home | Home screen | Change icon if needed |
| Category | Browse by category | Change icon if needed |
| AI | AI chat assistant | Change icon if needed |
| Cart | Shopping cart | Change icon if needed |
| Profile | Account and settings | Change icon if needed |
:::
Step 14: theme/ — App Visual Style
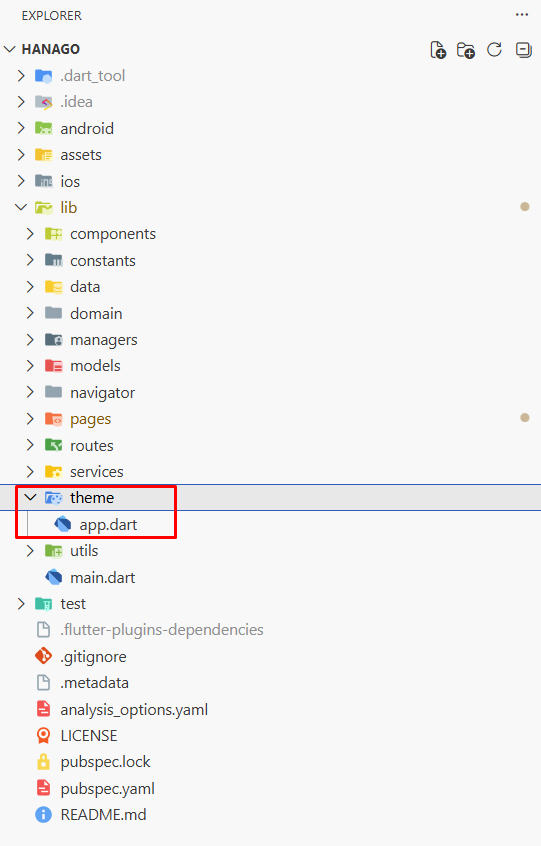
One file — app.dart — controls the overall look: button shapes, card styles, input field styles, and font.
| File | What It Controls | Action |
|---|---|---|
app.dart | Button shapes, card styles, input fields, font | Leave as is (reads from constants/ui.dart) |
To change the theme, edit
constants/ui.dartfirst. This file just reads those values.
Step 15: Android & iOS Settings
Android
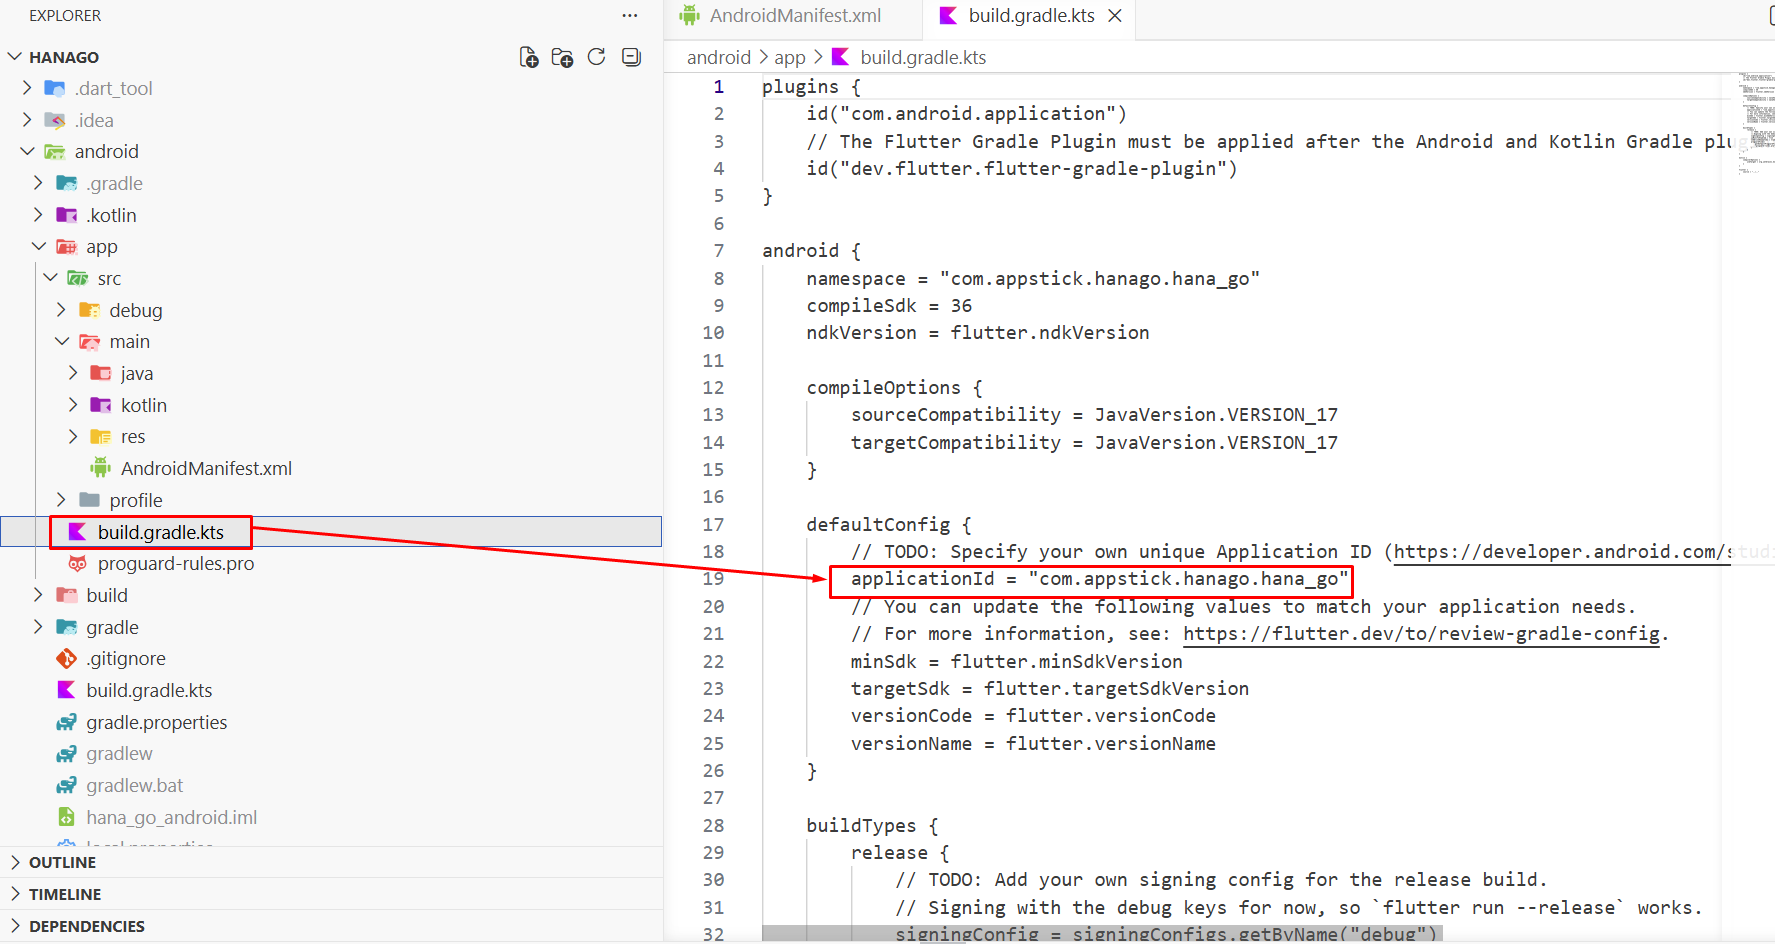
| File | Line | What to Change |
|---|---|---|
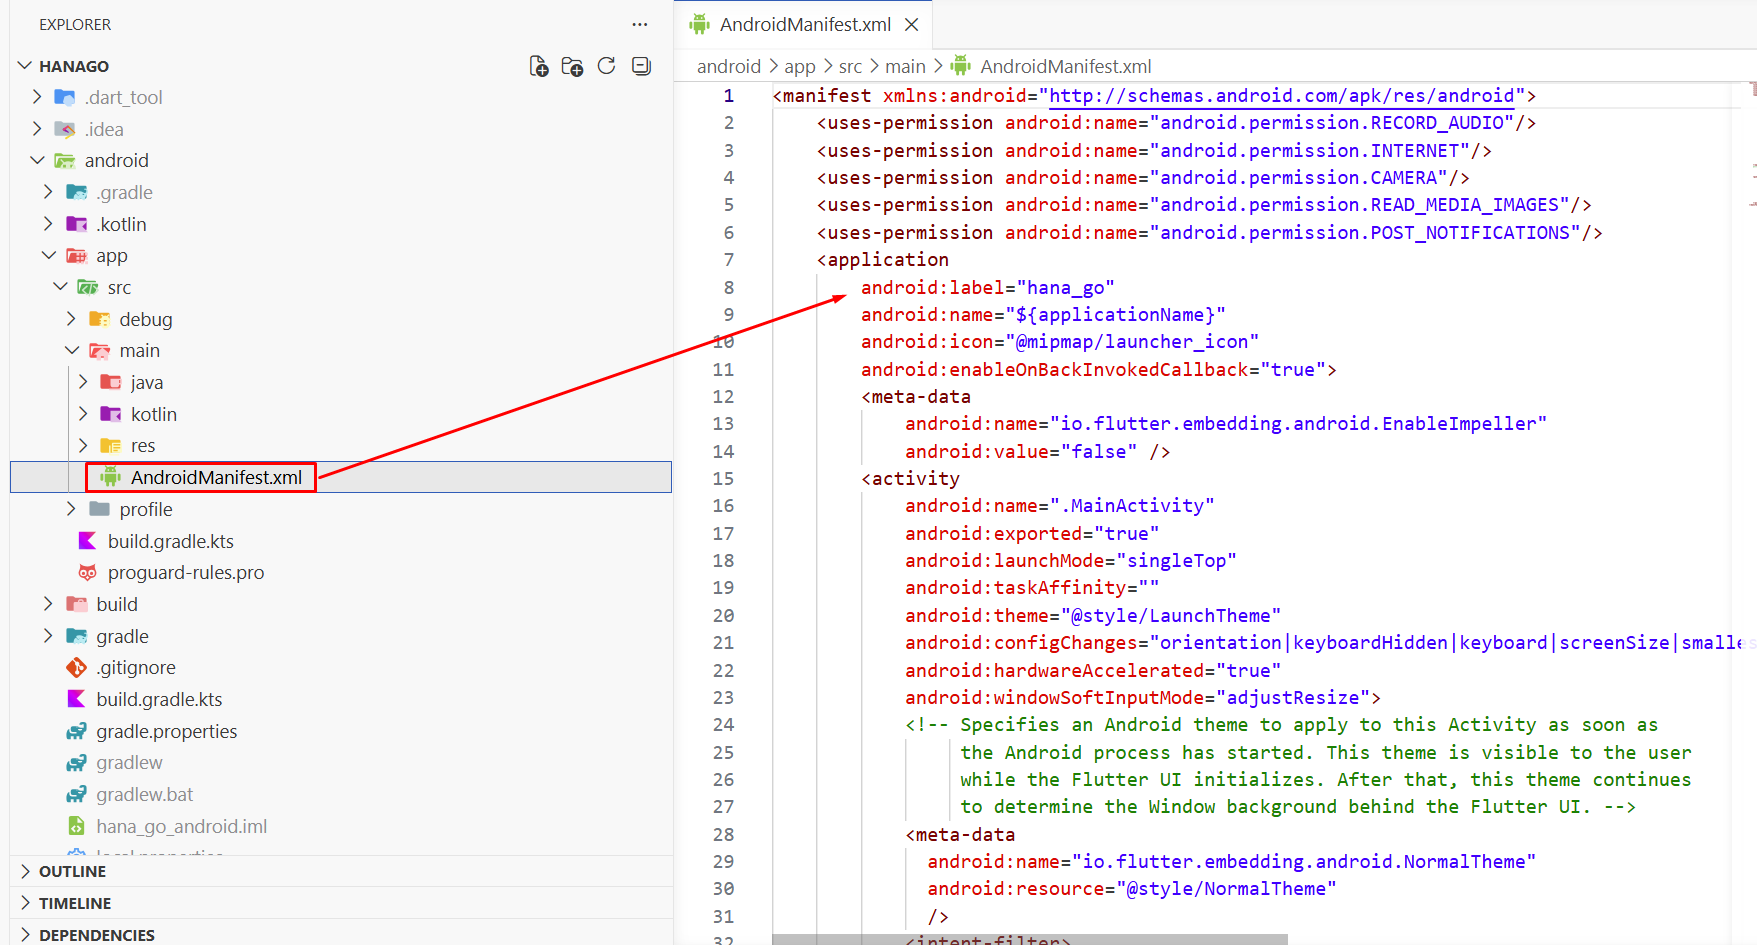
android/app/src/main/AndroidManifest.xml | Line 8 | Change android:label="hana_go" to your app name |
android/app/build.gradle.kts | Line 19 | Change applicationId to your package ID |
iOS
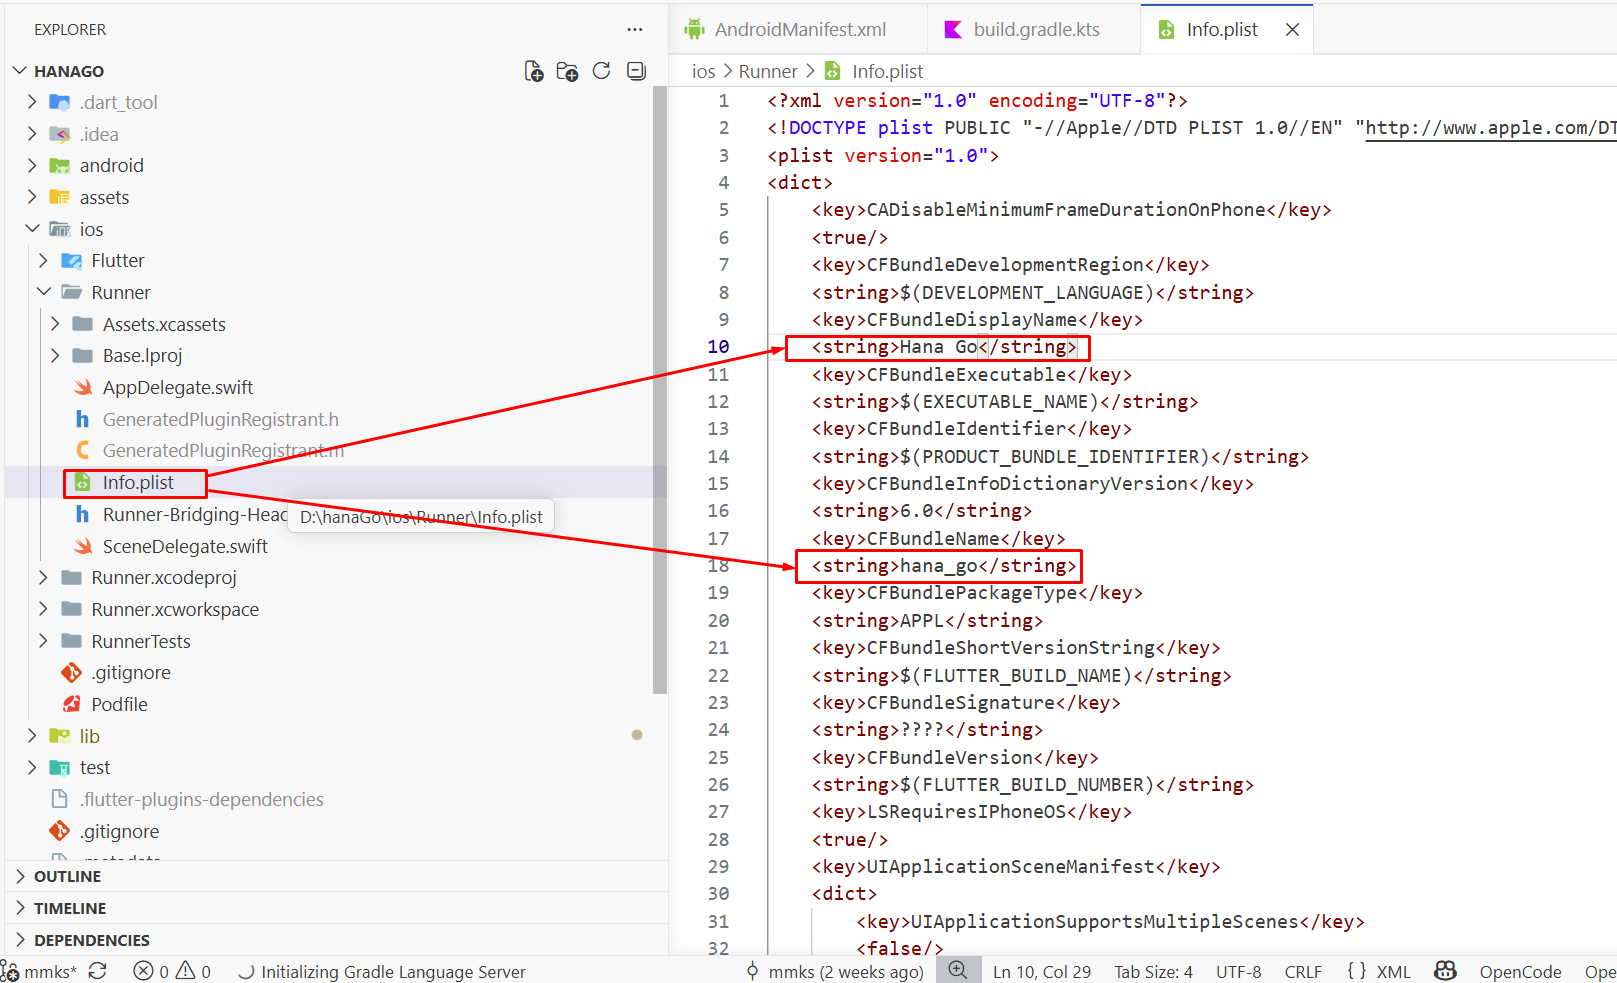
| File | Line | What to Change |
|---|---|---|
ios/Runner/Info.plist | Line 10 | Change CFBundleDisplayName to your app name |
ios/Runner/Info.plist | Line 18 | Change CFBundleName to your app name |
Automated Rename
Rename the app in one command instead of editing files manually.
1. Install package:
dart pub add change_project_name --dev
2. Create rename.json:
{
  "project_name": "greencart",
  "app_name": "GreenCart",
  "android_package_name": "com.appstick.greencart",
  "ios_bundle_identifier": "com.appstick.greencart",
  "custom_replacements": {
    "GreenCart": "greencart"
  }
}
3. Run:
dart run change_project_name
4. Verify:
flutter analyze
This changes app name, package name, and all import statements automatically.
Complete List: Files You Need to Change
Here is every file you should customize, in the order you should do it:
Branding (Do First)
| # | File | What to Change |
|---|---|---|
| 1 | assets/icons/logo.png | Replace with your logo |
| 2 | assets/images/Logo.png | Replace with your logo |
| 3 | assets/images/login_page.logo.png | Replace with your logo |
| 4 | assets/images/onboarding1.png | Replace with your onboarding image |
| 5 | assets/images/onboarding2.png | Replace with your onboarding image |
| 6 | assets/profile_image.png | Replace with default profile picture |
Colors & Config (Do Second)
| # | File | What to Change |
|---|---|---|
| 7 | lib/constants/ui.dart | Change primaryColor and other brand colors |
| 8 | lib/constants/app_config.dart | Change appName, supportEmail, aiName, pricing rules |
| 9 | lib/constants/images.dart | Update paths if you rename image files |
Text & Translations (Do Third)
| # | File | What to Change |
|---|---|---|
| 10 | assets/translations/en_US.json | Change all English text |
| 11 | Other translation files | Translate to your languages |
Product Data (Do Fourth)
| # | File | What to Change |
|---|---|---|
| 12 | assets/data/products.json | Replace with your product data |
Platform Settings (Do Last)
| # | File | What to Change |
|---|---|---|
| 13 | android/app/src/main/AndroidManifest.xml | App name on Android |
| 14 | android/app/build.gradle.kts | Android package ID |
| 15 | ios/Runner/Info.plist | App name on iPhone |
| 16 | pubspec.yaml | App version, asset folders |
Navigation (If Customizing)
| # | File | What to Change |
|---|---|---|
| 17 | lib/navigator/bottom_nav_bar.dart | Tab icons, labels, order |
| 18 | lib/routes/routes.dart | Add/remove screen routes |
| 19 | lib/routes/pages.dart | Connect new routes to screens |
Quick Reference
:::tip What to Change vs. What to Leave Alone
| Change These | Leave These Alone |
|---|---|
assets/icons/logo.png | lib/main.dart |
assets/images/*.png | lib/services/ |
assets/data/products.json | lib/models/ |
assets/translations/*.json | lib/data/loaders/ |
lib/constants/ui.dart | lib/data/repositories/ |
lib/constants/app_config.dart | lib/domain/ |
lib/navigator/bottom_nav_bar.dart | lib/utils/ |
android/ and ios/ settings | lib/theme/app.dart |
pubspec.yaml (version, assets) | lib/routes/ |
| ::: |
The Build Order
Here is the exact order I built this project, and the order you should follow when customizing:
1.  Set up Flutter environment (see Installation guide)
2.  Run the app as-is to see it work
3.  Replace logos and images (Step 3: Assets)
4.  Change colors (Step 6: Constants → ui.dart)
5.  Update app config (Step 6: Constants → app_config.dart)
6.  Edit translations (Step 3: Assets → translations/)
7.  Replace product data (Step 8: Data)
8.  Update Android/iOS settings (Step 15)
9.  Update pubspec.yaml version (Step 2)
10. Test on a real device
After each change, run
flutter runto see the result immediately.